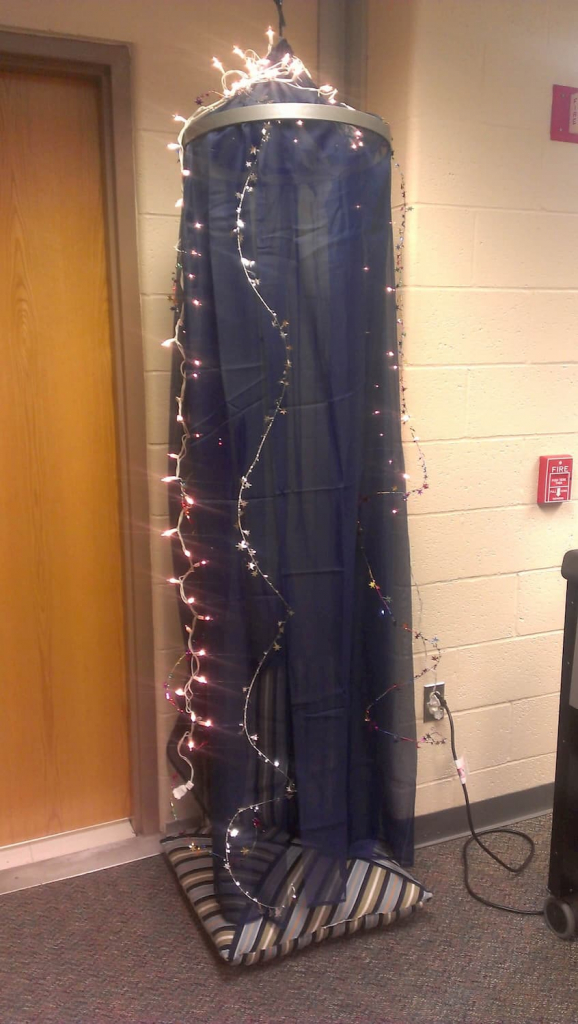
Taking a break from ed tech for some library space makeover fun. I finished making and hanging a reading tent I made for the library, something I’ve been working on for several weeks now. I LOVE how it looks in a normally-neglected corner, and I can’t wait to show the students!!
Note – When I tried out the pillows, I found that they pulled on the tent. A chair inside works best!
My inspiration was, of course, Pinterest. All those hours in the Pinterest black hole sometimes comes to fruition!
Most of the designs I found used a hula hoop and rope lights, but I didn’t feel like sewing on my temperamental sewing machine. It eats fabric randomly and regularly, so that wasn’t really a safe bet. Instead, I thought of embroidery hoops.
Materials needed for my tent design:
Disclaimer: This post contains affiliate links, which means if you purchase an item after clicking the link, I will receive a small commission. See Disclosures & Disclaimers for more information.
- 1 set of sheer curtains with a rod pocket, as long as you can get – Mine are 84″ long
- 1 safety pin (or more to attach decorations if you want)
- 1 large wooden circular embroidery hoop or quilting hoop, as big as you can find with a thick edge of at least 1″ – Mine is about 15″ diameter
- 1 small bottle of acrylic paint or stain (optional to paint the hoop if you want) – I used silver, but if I could buy it already painted I would! I imagine spray paint works just as well too, or check with your school’s art teacher to see if they have something on hand.
- 1 or 2 rolls of decorative ribbon, 3 yards each – I used 2 rolls of 3/8″ ribbon I found in the dollar bin at our local craft store. One was for decorating, the other for attaching the tent to the ceiling.
- Four (4) 9-foot rolls of star garland, 2 in silver and 2 in shiny multicolor
- 1 set of clear mini string lights or fairy lights
- 1 or more 3M small cord clips to keep the end of the lights out of the way.
- 1 electric timer, optional but saves my sanity!
Do-It-Yourself School Library Reading Tent
60 to 90 minutes 1 hour and 30 minutes
- Paint the hoops.
First, I took everything home and played around with it. I painted the outside of the embroidery hoop silver because we have an outer space theme this year. It took 3 coats, possibly because it doesn’t come with a finish on it.
- Thread ribbon through curtain rod pocket.
I used a safety pin attached to 1 of the ribbons to thread it through both curtains. Looking back, I wish I’d done 1 ribbon through each curtain so it would hang more evenly. Thread the ribbon through the curtain rod pocket and tie a knot. Let the ribbons hang down if you want them to be part of the decorations, but remember you’ll need some to hang the tent as well.

- Add the small hoop and decorations.
Place the smaller hoop inside the reading tent and spread out the curtains evenly with the gathered top in the center. Place your decorations that will hang down on top. Don’t worry about attaching them yet.
- Attach outer hoop.
Place the outer hoop over the smaller one so that the decorations hanging down are pinched between the hoops. Screw the embroidery hoop shut, just tight enough to hold the hoops together, but still loose enough to move and adjust the curtain and decorations.
- Adjust as needed.
Keeping the outer hoop loose, gently pull the top of the curtains up through the embroidery hoop. Make sure to keep it centered in the middle of the hoops so that it will hang straight. Adjust and move the hanging decorations around as needed.
- Secure and hang.
Tighten the whole embroidery hoop as tightly as you can with your fingers (no tools needed). Pull two of the ribbons up to hang it. I asked the band teacher to hold it up and adjusted the ribbons so the curtains hung down, but not to the floor. Then, he was kind enough to stand on a chair and tie it around the steel frame of the drop ceiling. He said they can hold the weight of the reading tent easily, so I’m not worried about it crashing down.
Update 2021: It only fell once the first year, and after securing the ribbons with a couple more knots, it never fell again. Since the hoop is so lightweight, there is very little chance of it hurting anyone. - Add string lights, if desired.
If you want to add string lights, I recommend wrapping them around the top and let the ends hang down. I kept the string lights tight enough that they tangled with each other to stay on top of the tent. I used a small 3M hook on the wall to hold the end of the lights that wasn’t plugged in. For my own sanity and convenience, I’m buying a timer so I don’t have to remember to turn the lights on and off every day.
I’m incredibly happy with the end result, and with a chair under it, I think it will be a cozy spot students will want to curl up and read in.